


Keyestudio Çok Amaçlı Shield V1
Çok Amaçlı Shield V1, Arduino tabanlı bir öğrenme kartıdır. Lehim ve bağlantıya gerek yoktur. Deneylerinizi tamamlamak için programı doğrudan indirin.
Çok amaçlıdır ve test edilen tüm modüllerin kod kitaplıklarını sunuyoruz. Doğrudan kullanabilirsiniz. Farklı deneylerinize yardımcı olmak için shield üzerinde genişletilmiş bağlantı noktaları vardır.
Özellikler
- UNO R3 ve MEGA 2560 gibi ana denetleyicilerle uyumludur.
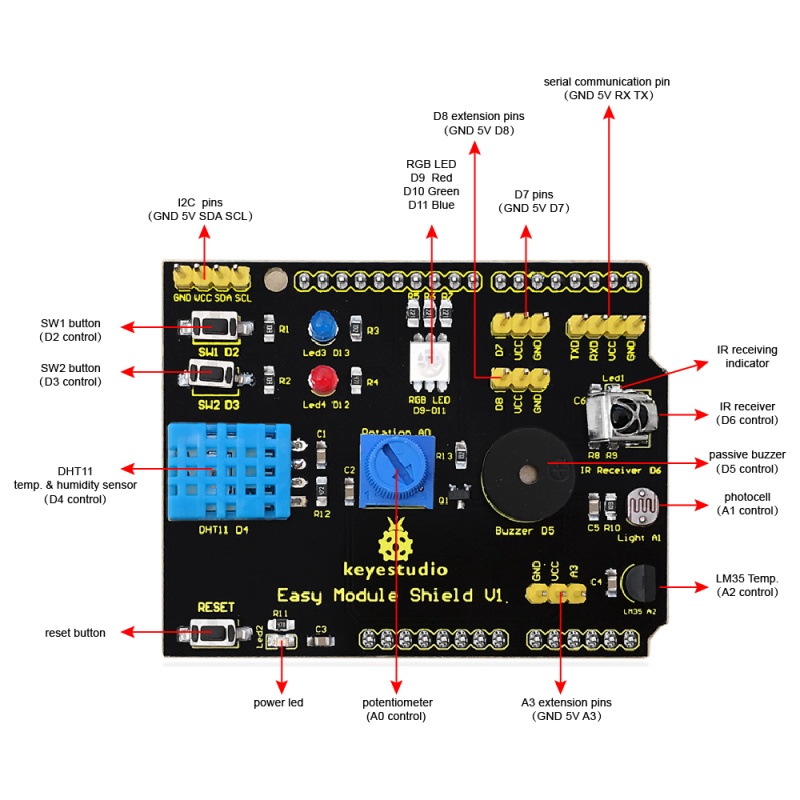
- Program durumunu göstermek için 2 LED göstergesi vardır.
- Harici kesme deneyi için 2 anahtar ile birlikte gelir.
- Sıfırlama (reset) düğmesiyle gelir
- Sıcaklık ve nemi ölçmek için DHT11 sensörü vardır.
- Analog giriş için bir potansiyometre bulunur
- Alarm için pasif bir buzzer vardır.
- Tam renkli bir RGB LED ile birlikte gelir
- Işık parlaklığını tespit etmek için bir fotoseli vardır
- LM35D sıcaklık sensörü ile birlikte gelir
- Kızılötesi bir alıcıya sahiptir
- 2 dijital pin (D7 ve D8)
- 1 analog pin (A3)
- Bir IIC arayüzü
- Bir TTL seri pin
Ayrıntılar
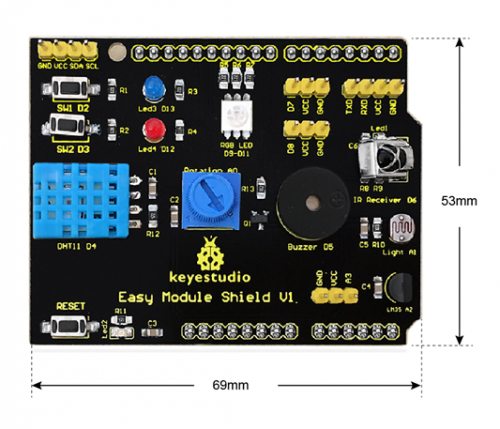
- Boyutlar: 69mm * 53mm * 19mm
- Ağırlık: 21g
Arayüz Talimatı
Bağlantı Şeması
Simply plug the shield into UNO R3 board .
Upload the Code /Kodu Yükleme
Note: Before compile the code, do remember to add the necessary libraries inside the libraries directory of Arduino IDE .
You can download all the libraries from the link here:
https://drive.google.com/open?id=1Fsr5NW8Ez8ziYh0jVmiviS9ldvR9NDei
You can click here to download the code or directly copy the code below.
#include#include dht11 DHT; #define DHT11_PIN 4 //buzzer pin int buzzer = 5; //button pins int KEY2 = 2; int KEY3 = 3; //pin definition of flowing light int led5 = 13; int led4 = 12; int led3 = 11; int led2 = 10; int led1 = 9; int RECV_PIN = 6; //define input pin on Arduino IRrecv irrecv(RECV_PIN); decode_results results; char i=0,flag=2; void setup () { Serial.begin(9600); irrecv.enableIRIn(); // Start the receiver attachInterrupt(0, falling0, FALLING); attachInterrupt(1, falling1, FALLING); pinMode(buzzer,OUTPUT); digitalWrite(buzzer,HIGH); pinMode(led1,OUTPUT); pinMode(led2,OUTPUT); pinMode(led3,OUTPUT); pinMode(led4,OUTPUT); pinMode(led5,OUTPUT); for(char i=9;i<14;i++) digitalWrite(i,LOW); } void loop() { if(flag==0) { buzzer_(); //testing buzzer led_display(); //testing LED } if(flag==1) { Serial.println("status, Hum(%), Tem(C) analog_val light_val lm35_val"); DHT11(); Serial.print(""); analog(); //testing analog input Serial.print(""); Light(); Serial.print(""); LM35(); Serial.println(""); delay(800); } if(flag!=0 & flag!=1) { if (irrecv.decode(&results)) { Serial.println(results.value, HEX); irrecv.resume(); // Receive the next value } } } void DHT11() { int chk; chk = DHT.read(DHT11_PIN); // READ DATA switch (chk) { case DHTLIB_OK: Serial.print("OK "); Serial.print(DHT.humidity,1); Serial.print(""); Serial.print(DHT.temperature,1); break; case DHTLIB_ERROR_CHECKSUM: Serial.print("Checksum error "); break; case DHTLIB_ERROR_TIMEOUT: Serial.print("Time out error "); break; default: Serial.print("Unknown error "); break; } } void buzzer_(void) { char i; for(i=0;i<80;i++)// output a frequency sound { digitalWrite(buzzer,LOW);// sound delay(1);//delay1ms digitalWrite(buzzer,HIGH);//not sound delay(1);//ms delay } for(i=0;i<100;i++)// output a frequency sound { digitalWrite(buzzer,LOW);// sound digitalWrite(buzzer,HIGH);//not sound delay(2);//2ms delay } } void led_display() { digitalWrite(led1,HIGH); delay(500); digitalWrite(led1,LOW); digitalWrite(led2,HIGH); delay(500); digitalWrite(led2,LOW); digitalWrite(led3,HIGH); delay(500); digitalWrite(led3,LOW); digitalWrite(led4,HIGH); delay(500); digitalWrite(led4,LOW); digitalWrite(led5,HIGH); delay(500); digitalWrite(led5,LOW); } void analog() { int val; val=analogRead(A0); Serial.print(val); } void Light() { int val; val=analogRead(A1); Serial.print(val); } void LM35() { int val; val=analogRead(A2); Serial.print(val); } void falling0() { flag=0; } void falling1() { flag=1; }
Test Result / Test Sonucu
Done uploading the code to the board, the power led 2 is normally on, open the serial monitor and set the baud rate to 9600.
Aimed at the IR receiver, press the buttons on IR remote control, you should see the decoding value of button is displayed on the monitor.
Do not press too long, or else appear the data error like FFFFFF. 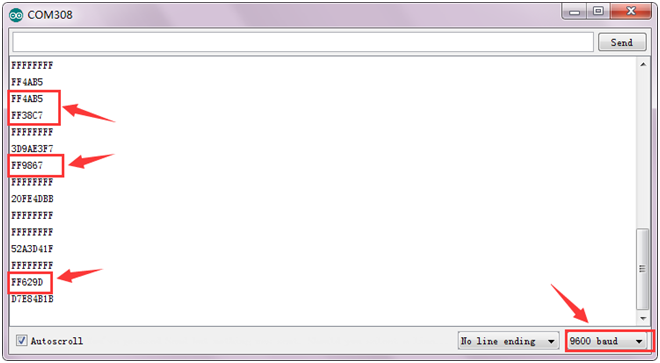
If press the SW1 button, passive buzzer beeps and then RGB LED will emit the red, green and blue light in sequence. Also the red led3 and blue led 4 light up, circularly. 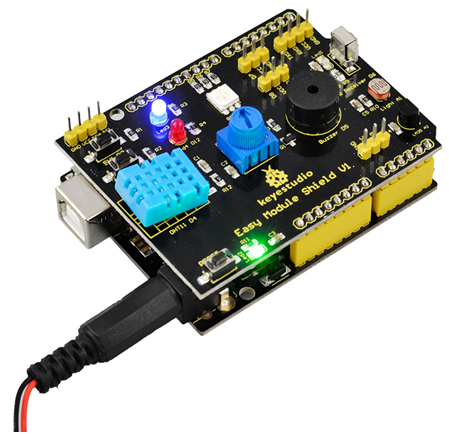
If press the SW2 button, passive buzzer stops beeping and LEDs not light.
Then open the serial monitor and set the baud rate to 9600. Press the SW2 button again, the serial monitor will display the data shown below.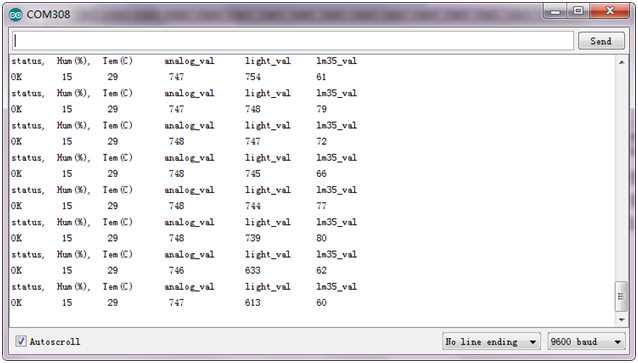
From the data shown on the monitor, you can get the details as follows:
- The first column is status OK.
- The second column is the humidity value measured by DHT11 sensor;
- The third column is the temperature value measured by DHT11 sensor;
- The fourth column is the analog value measured by potentiometer, in the range of 0-1023;
- The fifth column is the analog value measured by photocell. The stronger the light is, the greater the value is.
- The sixth column is the analog value measured by LM35 temperature sensor, which can be used to calculate the specific temperature value.
Resources / Kaynaklar
Download the PDF:
https://drive.google.com/open?id=1blxPslK116UNga7S2rjPPXbC4FRV4xub
Download the code:
https://drive.google.com/open?id=1UQF9_II_Y10PdQY6PQcMzXncld6LpOrW
Download the libraries:
https://drive.google.com/open?id=1Fsr5NW8Ez8ziYh0jVmiviS9ldvR9NDei