


Keyestudio Raspberry Pi JoyStick Shield
Contents
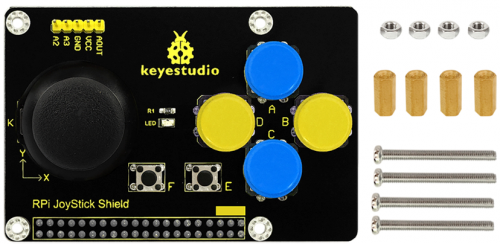
keyestudio RPI JoyStick Shield
Introduction
Joystick kontrolünün harika dünyasına hoş geldiniz. Raspberry Pi'nize bir joystick eklemek çok sayıda yeni kapı açar. Artık bir robotu, kamerayı kontrol etmek, oyun oynamak veya istediğinizi yapmak için Raspberry Pi'yi ve joystick'i kullanabilirsiniz.
Kumanda kolu kalkanı, dört ayrı düğme, bir başparmak kumanda kolu ve iki küçük düğme ile birlikte iki basit analog giriş ve bir analog çıkış sağlar. Kurulum paketi, kaynak kodu ve hızlı başlangıç kılavuzu PDF'i sağlayacağız. Size adım adım öğreteceğiz, bu yüzden endişelenmeyin!
Specification
- Chip:pcf 85911
- Besleme Gerilimi: 5V
- Dört ayrı düğme, bir başparmak kumanda kolu ve iki küçük düğme
Connection Diagram
Directly plug it into the pi and max it with copper pillar and screws as shown in below figure.
Sample Code
#include#include #include #define Address 0x48 #define BASE 64 #define A0 BASE+0 #define A1 BASE+1 #define A2 BASE+2 #define A3 BASE+3 char dat; int main(void) { unsigned char value; wiringPiSetup(); pinMode(25,INPUT); pinMode(7,INPUT); pinMode(0,INPUT); pinMode(2,INPUT); pinMode(3,INPUT); pinMode(4,INPUT); pinMode(5,INPUT); pullUpDnControl(25,PUD_UP); pullUpDnControl(7,PUD_UP); pullUpDnControl(0,PUD_UP); pullUpDnControl(2,PUD_UP); pullUpDnControl(3,PUD_UP); pullUpDnControl(4,PUD_UP); pullUpDnControl(5,PUD_UP); pcf8591Setup(BASE,Address); while(1) { value=analogRead(A0); printf("X:%d ",value); value=analogRead(A1); printf("Y:%d ",value); dat=digitalRead(25); printf("K:%d ",dat); dat=digitalRead(7); printf("A:%d ",dat); dat=digitalRead(0); printf("B:%d ",dat); dat=digitalRead(2); printf("C:%d ",dat); dat=digitalRead(3); printf("D:%d ",dat); dat=digitalRead(4); printf("E:%d ",dat); dat=digitalRead(5); printf("F:%d\n",dat); delay(100); // analogWrite(BASE,value++); // printf("AOUT:%d\n",value++); // delay(50); } }
Program Writing
1.Install Wiringpi Library
Wiring Pi is a library. WiringPi supports analog reading and writing, and while there is no native analog hardware on a Pi by default, modules are provided so other A/D and D/A devices can be implemented relatively easily. We will provide a Wiringpi installation package or click on this URL: https://projects.drogon.net/raspberry-pi/wiringpi/download-and-install/ (it should open in a new page) to download the latest version. This will download a .tar file with a name like wiringPi-b0a60c3.tar. Then copy the file and put it into the raspberry pi file as shown in below figure: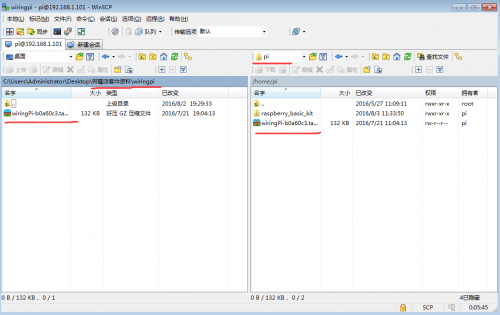
Type in this command to unzip the source code and install:
tar xfz wiringPi-98bcb20.tar.gz
cd wiringPi-98bcb20
./build
Note that the actual file name will be different (may not be 98bcb20) – you will have to check the name and adjust accordingly. Here is the interface after installing WiringPi as shown in below figure.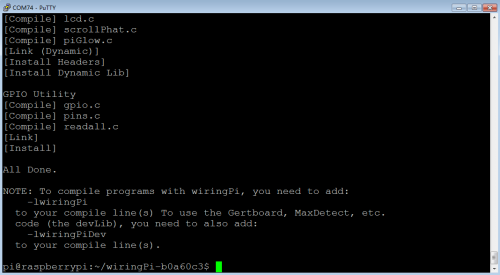
WirtingPi includes a set of gpio commands to control the GPIO pins of the Raspberry Pi. Type in the command to check the installation:
gpio -v
gpio readall
The interface as shown in below figure means complete installation.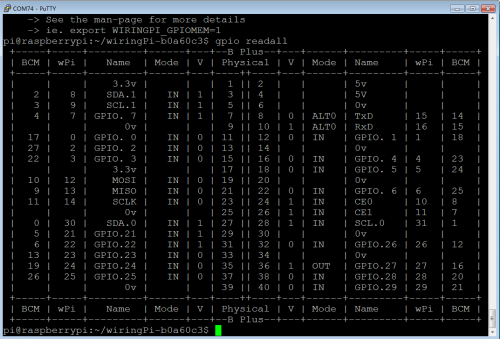
2.Enable I2C Utility
The I2C bus allows multiple devices to be connected to your Raspberry Pi. Before using I2C it needs to be configured. Run this command: sudo raspi-config and follow the prompts to install I2C. Now complete the following steps :
Select "9 Advanced Options”
Select "A6 I2C”
The screen will ask if you want the ARM I2C interface to be enabled :
Select "Yes”
Select "Ok”
Select "Finish” to return to the command line
When you next reboot the I2C module will be loaded.
3.Programming
Copy the file rpi_joystick provided by us and put it into your pi directory through winSCP. Next , type this command: cd rpi_joystick to go inside the rpi_joystick folder. Then type this command: make to make an executable file pcf8591-joytokey as shown in below figure. This means this is the file we run to launch the program.
Finally type this: sudo ./pcf8591-joytokey to launch the program. 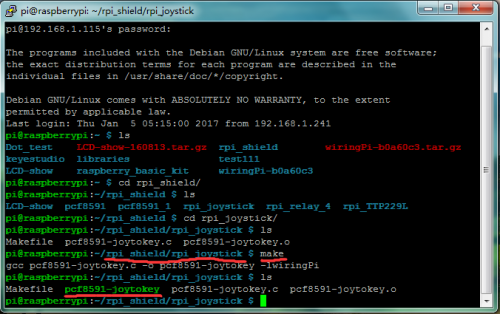
Result
Press the thumb joystick and buttons, and values are printed on the terminal as shown in below figure. Then use Ctrl+C to quit the program.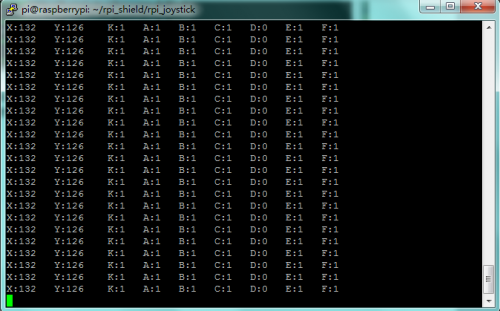
Documents
PDF File:
https://drive.google.com/open?id=14r-C7PtOPOc1xJuy7oq7Yw1z7e4ri3s6
Installation Package:
https://drive.google.com/open?id=18NX_KAY7dudyl78y0WBwFoGSXrZ-ZpHR
Source Code:
https://drive.google.com/open?id=1ZYz7mdsV4OLVkxhUa2OXMfcOP9T8cfE0